If you’re setting up a shed—for tools, equipment, or extra items—a shed base is non-negotiable. Skipping it to save time is costly: a good shed base is key to your shed’s stability and longevity.
Your shed’s lifespan depends on its base. Without a solid shed base, wet soil causes rot, uneven ground leads to sinking, and pests get in. For a base for storage shed, this is critical—you don’t want valuable tools on damp, unstable ground.
Skipping the shed base turns investments into headaches: wooden sheds may rot in 2-3 years, metal ones rust faster, doors stick, and sheds can even lean or collapse.
This guide breaks down why a shed base matters, factors to consider when choosing one, best materials (from concrete base for shed to plastic shed base), step-by-step prep, and common mistakes—so you can build a basic shed base (or heavy-duty option) that lasts decades.
1. Why the Shed Base Matters
Let’s get straight to the point: your shed base does three big jobs that keep your shed functional and durable. Without it, nothing else works right.
Role in Support, Leveling, and Moisture Protection
First, the shed base supports weight—your shed’s own weight plus everything inside. A base for storage shed holding lawnmowers, toolboxes, or even kayaks needs to distribute that weight evenly. If the ground isn’t supported, one corner might sink, pulling the whole structure out of shape .
Second, it keeps the shed level. A uneven shed base means doors won’t close, windows might stick, and the floor could warp. Imagine trying to stack boxes on a sloping shed floor—nothing stays in place. Even a small slope can cause big problems over time.
Third, it blocks moisture. Soil soaks up rain and stays damp, which seeps into your shed’s floor. A shed base raises the shed off the ground (ideally 4-6 inches) and acts as a barrier. Materials like concrete base for shed are impermeable, so water can’t get through, while even a basic shed base of gravel helps drain water away .
How It Affects Lifespan and Usability
A good shed base adds years to your shed’s life. Studies show sheds with a proper shed base last 10-15 years longer than those without. For example, a wooden shed on soil might rot in 5 years, but on a concrete base for shed or plastic shed base, it can last 20+ years .
Usability takes a hit without a shed base too. If your shed leans, you might can’t use half the space because items slide to one side. Moisture inside leads to mold on tools, rust on metal parts, and a musty smell that’s hard to get rid of. A base for storage shed fixes this by keeping the interior dry and level.
Pests are another issue. Without a shed base, rodents and insects nest under the shed and chew through walls to get inside. A solid shed base closes off these entry points—especially concrete base for shed or elevated plastic shed base kits .
The Cost of Cutting Corners
To make it real, let’s look at the risks of skipping a shed base:
- Rot and rust: 78% of shed damage starts with ground moisture .
- Structural shift: 60% of leaning sheds are due to no base or a poor one .
- Pest infestations: Sheds without a base are 3x more likely to have rodent problems .
The table below sums up how a shed base solves these issues:
|
Problem Without Shed Base |
How a Shed Base Fixes It |
|
Rot from ground moisture |
Raises shed off soil; blocks water seepage |
|
Uneven sinking |
Distributes weight evenly; prevents shifting |
|
Stuck doors/windows |
Keeps shed level for smooth operation |
|
Pest intrusion |
Closes gaps between shed and ground |
|
Short lifespan (5-7 years) |
Extends life to 15-25+ years |
Now that you know why a shed base is non-negotiable, let’s move on to how to choose the right one. Next, we’ll cover the key factors—like your shed’s size, ground type, and DIY skills—that will help you pick between a concrete base for shed, plastic shed base, or another option.

2. Factors to Consider Before Choosing a Base
Picking the right shed base isn’t one-size-fits-all—match it to your situation to avoid weak, costly, or hard-to-maintain options. Below are 5 key factors every shed owner (especially for a base for storage shed) should check:
Shed Size and Weight
Bigger/heavier sheds need stronger bases. A 6x4ft, 200lb shed works with a basic shed base (gravel) or plastic shed base; an 800lb shed with tools needs a timber frame or paving slabs; a 1,500lb+ shed (or heavy storage) demands a concrete base for shed. Ignoring this leads to sinking and damage.
Ground Condition and Slope
Flat, firm ground works with most bases (gravel, plastic shed base, paving slabs). Gentle slopes (1-2in/10ft) need extra gravel; steep slopes need a timber frame or concrete base for shed. Soft/clay soil needs drainage (plastic shed base or concrete); rocky ground suits gravel/paving slabs (avoid timber frames).
Drainage and Water Management
Water ruins bases—even a basic shed base needs drainage. Wet/flood-prone areas: choose gravel (fast drainage) or plastic shed base (built-in holes). A concrete base for shed needs a 1/8in/ft slope for runoff. Avoid water-trapping bases (solid wood) to keep a base for storage shed dry.
Budget and DIY Ability
Gravel (cheapest, 1-2 days, easy) is best for beginners. Plastic shed base (slightly pricier, half a day, no heavy lifting) is also beginner-friendly. Paving slabs/timber frames (moderate difficulty, 2-3 days) need basic skills. Concrete base for shed (most expensive, 3-4 days, hard) may need pro help.
Climate and Long-Term Maintenance
Cold/snowy areas: concrete base for shed (frost-resistant) or plastic shed base (flexible). Hot/dry areas: gravel/paving slabs (no warping). Low maintenance: concrete or plastic (wipe clean yearly). High maintenance: gravel (top up every 2-3 years) or timber (re-stain yearly).
Got these factors in mind? Great—now let’s look at the best materials for your shed base, so you can pick the one that fits your needs.
3. Best Materials for Shed Bases
Now that you know what to consider, let’s dive into the 5 most popular shed base materials. Each has pros and cons, so we’ll focus on what matters most: strength, ease of use, and how well it works for a base for storage shed.
1. Concrete Slab: Strongest, Long-Lasting
A concrete base for shed is the most durable choice—solid, non-shifting, and moisture-resistant, ideal for large/heavy sheds or harsh climates. Pros: lasts 25+ years, supports 2,000+ pounds, blocks pests, low-maintenance. Cons: time-consuming to install (mix, pour, 2-3 days to dry), heavy, hard to relocate. Best for heavy storage (like a base for storage shed with tools) or frost/snow-prone areas.
2. Gravel Base: Best Drainage, Affordable
Gravel is the cheapest, easiest basic shed base—great for small/medium sheds or rainy areas. Pros: costs less than half concrete, drains fast, easy to install (dig, level, pour), flexible (add more if it sinks). Cons: weak for heavy sheds, needs a weed barrier, shifts over time (rake level every 2-3 years). Best for small plastic/wooden sheds, flat ground, tight budgets, or as a sub-base for other materials.
3. Timber Frame: Quick and Flexible
A timber frame (pressure-treated wood) lifts sheds off the ground, balancing gravel and concrete. Pros: builds in 1-2 days (even for beginners), ideal for wet/sloped ground, easy to adjust size. Cons: needs yearly stain treatment (prevents rot), weak for heavy sheds, risks termites (use treated wood). Best for medium sheds, sloped ground, or those who may relocate the shed.
4. Paving Slabs: Easy DIY Solution
Paving slabs (concrete/stone) make a flat, stable shed base—easier than concrete, more durable than gravel. Pros: no mixing (lay on gravel sub-base), neat-looking, lasts 15-20 years, good for wooden-floor sheds. Cons: needs careful leveling, heavy (needs help carrying), gaps let weeds grow (fill with sand). Best for medium sheds, flat ground, or those wanting a tidy base without concrete.
5. Plastic Shed Base Kits: Lightweight and Modern
Plastic shed base kits (interlocking gravel-filled grids) are lightweight yet strong. Pros: one person can carry, installs in hours (interlock grids + add gravel), good drainage (grid holes), durable (resists rot/frost/pests). Cons: pricier than gravel (cheaper than concrete), needs gravel (adds cost/time), weak for very heavy sheds. Best for small/medium sheds, beginners (no heavy work), low-maintenance needs—also a great base for storage shed (keeps floors dry).
The chart below sums up how these materials compare—use it to pick your perfect shed base:
|
Material |
Strength |
Drainage |
DIY Ease |
Lifespan |
Best For |
|
Concrete base for shed |
10/10 |
7/10 |
3/10 |
25+ yrs |
Heavy/large sheds, harsh climates |
|
Gravel |
5/10 |
10/10 |
9/10 |
10-15 yrs |
Small sheds, tight budgets |
|
Timber Frame |
7/10 |
8/10 |
7/10 |
10-12 yrs |
Medium sheds, sloped ground |
|
Paving Slabs |
8/10 |
6/10 |
6/10 |
15-20 yrs |
Medium sheds, neat appearance |
|
Plastic shed base |
6/10 |
9/10 |
8/10 |
15-20 yrs |
Small/medium sheds, beginners |
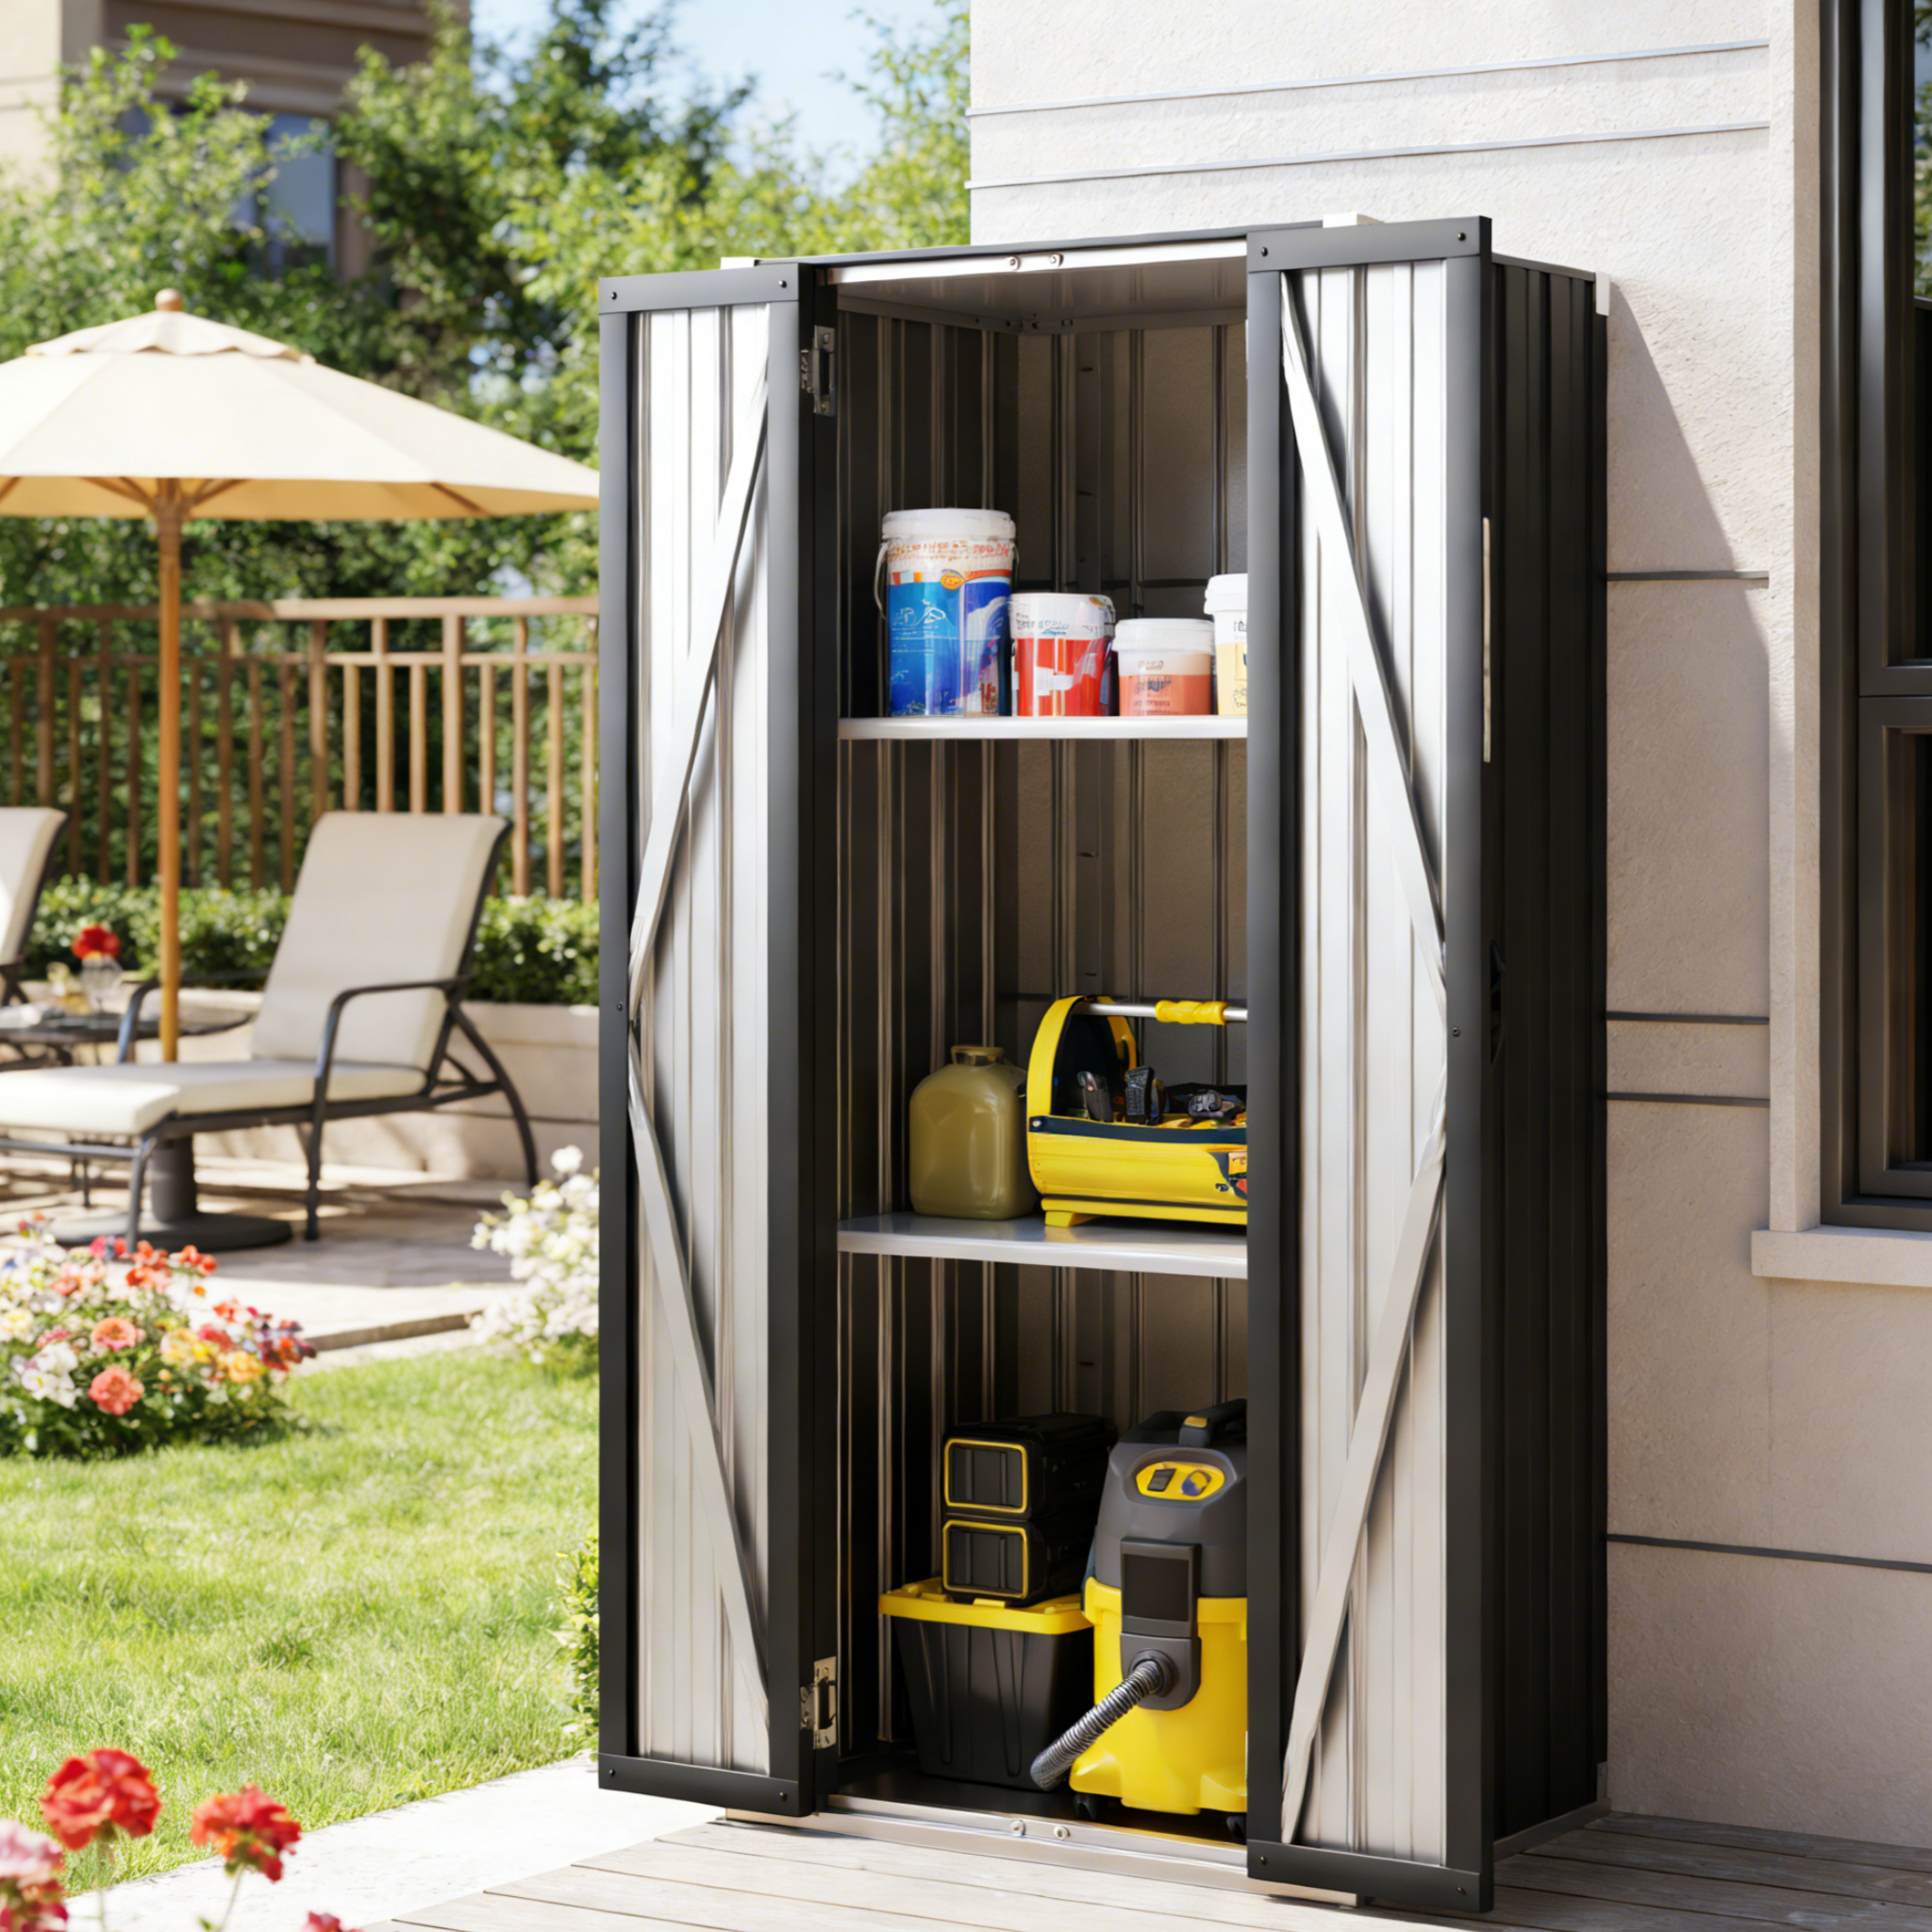
If you’re already leaning into this easy, low-maintenance base, pairing it with the YODOLLA Outdoor Metal Wall Side Lean-To Storage Shed is a natural fit. Now that you’ve picked your material, let’s walk through how to install your shed base step by step—no fancy tools required!

4. How to Prepare a Shed Base (Step-by-Step)
Installing a shed base doesn’t have to be complicated. Follow these 5 steps, and you’ll have a stable base that lasts for years—whether you’re using gravel, plastic shed base, or concrete base for shed.
Step 1: Site Selection and Clearing
First, pick the right spot for your shed (and shed base). Remember the factors we talked about—flat ground, good drainage, and away from trees (roots can break the base!). Start by marking the area with stakes and string, making the area 6 inches larger than your shed on all sides (this gives you room to work and helps with drainage). Then clear the site by removing grass, weeds, rocks, and debris, and dig down 2-4 inches (deeper if you’re using concrete—4-6 inches) to create a flat surface. Most importantly, check for underground lines (water, gas, electric) before digging! Call your local utility company—this is free and keeps you safe. For a base for storage shed, pick a spot close to your house (easy to grab tools) but not too close to walls (leaves can pile up and trap moisture).
Step 2: Leveling and Compacting
An uneven base = an uneven shed. This step is crucial—don’t rush it! Lay a long level (4-6 feet) across the cleared area to check for high and low spots. Dig down high spots with a shovel, and fill low spots with small gravel (1/2 inch) before tamping it down with a tamper (or the end of a shovel) to make it firm. Repeat this process until the entire area is level. For sloped ground, you may need to build a small retaining wall with landscape timbers to hold the base in place. Even a 1-inch slope can make your shed base sink over time, so a level base is key to keeping doors closing smoothly and preventing floor warping.
Step 3: Adding Sub-Base (If Needed)
A sub-base is a layer under your main base that adds strength and improves drainage. Not all bases need it—but it’s a good idea for gravel, paving slabs, or plastic shed base. For gravel, paving slabs, or plastic shed base, spread a 2-inch layer of compacted gravel (3/4 inch size) over the leveled area and tamp it down firmly—this stops the main base from sinking into the soil. For a concrete base for shed, skip the gravel sub-base (concrete bonds directly to soil) and instead lay a weed barrier (heavy-duty plastic) to prevent weeds from growing up through cracks. For a timber frame, lay a 1-inch layer of gravel under the beams to keep wood away from damp soil (preventing rot). Using a geotextile fabric (weed barrier) under the sub-base is a pro tip—it stops soil from mixing with gravel and clogging drainage.
Step 4: Installing the Main Base Material
Now lay your main shed base material—here’s the simplified process for each type:
- Gravel base (basic shed base): Spread 2-3 inches of clean 1/2-inch gravel over the sub-base. Rake evenly, check level with a long level (adjust gravel as needed), then tamp firmly to compact.
- Plastic shed base: Unpack and interlock grids (cut to fit edges with a utility knife). Set on the gravel sub-base, ensure level (add gravel under low spots), then fill grid cells with 1/4-inch gravel (flush with grid top) and tamp lightly.
- Concrete base for shed: Build a 2x4 wood frame (securing with stakes). Mix concrete (1:2:3 concrete:sand:gravel), pour to 3-4 inches thick. Smooth with a trowel, add a 1/8-inch-per-foot slope for drainage, then let dry 2-3 days (don’t use until fully cured).
- Paving slabs: Spread 1 inch of sand over the gravel sub-base and rake smooth. Lay slabs with 1/4-inch gaps, check level (tap high slabs with a mallet, add sand under low ones), then fill gaps with fine sand and sweep to lock.
- Timber frame: Cut pressure-treated 4x4 timbers to shed size (plus 6 inches all sides). Lay on gravel sub-base (16 inches apart, like floor joists), check level (add gravel under low spots). Secure with 3-inch deck screws, then anchor to ground with metal stakes.
Step 5: Checking Level and Stability
The final step is to make sure your shed base is rock-solid. Don’t skip this—one quick check can save you from big problems later! Use the long level again to check across the entire base (front to back, side to side, and diagonally), and if any spot is off, adjust it (add gravel, tap slabs, or smooth concrete). Test stability by walking over the base—there should be no sinking or shifting. For a concrete base for shed or paving slabs, tap them with a hammer—they should sound solid (no hollow echoes, which mean they’re not set right). For a base for storage shed, place a heavy box (50-100 pounds) on different spots—this mimics the weight of tools, and the base should hold it without sinking.
Once you’re happy with the level and stability, your shed base is ready! You can now assemble your shed on top—just make sure to anchor the shed to the base (use screws for timber/concrete) to keep it secure through wind and weather.

5. Tips & Common Mistakes
You’ve learned how to choose and install a shed base—but small missteps here can still ruin your hard work. Let’s break down the most important tips to keep your base strong, plus the common mistakes you need to avoid (so you don’t waste time or money).
Key Tips for a Long-Lasting Shed Base
First, always keep your shed raised and anchored. Even the best shed base (like a concrete base for shed or plastic shed base) needs a little extra protection from wind and moisture. Raise the shed at least 4-6 inches off the ground—this stops water from splashing up onto the floor and keeps pests from nesting underneath. For anchoring, use metal brackets or screws to attach the shed to the base: wind can lift lightweight sheds, and anchoring keeps them stable during storms. For a base for storage shed, this is extra important—you don’t want your tools flying around if the shed shifts!
Second, inspect your shed base regularly. Set a reminder to check it every 3-6 months (and after heavy rain or snow). Look for cracks in concrete, shifting gravel, or rotting wood in timber frames. If you spot small issues early—like a loose paving slab or a gap in a plastic shed base grid—you can fix them fast. For example, adding a little gravel to a sunken spot in a basic shed base takes 10 minutes, but ignoring it could lead to a sloped shed in 6 months.
Third, use treated materials where possible. If you’re using a timber frame, always pick pressure-treated wood—it resists rot and termites. For gravel or paving slabs, lay a weed barrier underneath to stop weeds from pushing through. Even a cheap geotextile fabric can save you hours of pulling weeds later. For a concrete base for shed, mix in a waterproof additive if you live in a wet climate—this makes the concrete more resistant to water damage.
Common Mistakes to Avoid
The biggest mistake people make is placing the shed directly on soil. Soil soaks up moisture, shifts with the seasons, and lets weeds and pests in. Even a small basic shed base of gravel is better than nothing—soil will ruin your shed floor in 1-2 years, no matter how well-built the shed is.
Another big error is skipping proper drainage. You might think a shed base is enough, but if water can’t escape, it will pool under the base and cause damage. For example, a concrete base for shed without a slope will collect rainwater, leading to cracks as the water freezes and expands. A plastic shed base works great, but if you don’t fill the grids with gravel (or use gravel that’s too fine), water can’t drain and will sit in the grids. Always make sure water flows away from the base—toward a lawn or drainage ditch, not toward your house.
Don’t skimp on leveling, either. It’s tempting to rush this step, but an uneven shed base causes more problems than you think. Doors won’t close, windows will stick, and the shed floor will warp. Even a 1-inch difference in height can make your shed unusable over time. Take the extra hour to get the base perfectly level—your future self will thank you.
Finally, don’t ignore climate. If you live in a snowy area, a thin basic shed base of gravel might not hold up to heavy snow loads. A concrete base for shed or reinforced plastic shed base is a better choice here. In hot, dry areas, avoid dark-colored concrete (it absorbs heat) if you’re storing temperature-sensitive items—opt for light-colored paving slabs or a gravel base instead.
A Quick Tip for Storage Sheds
If you’re using your shed as a base for storage shed, add a layer of plywood on top of the base (especially if it’s gravel or a plastic shed base). Plywood creates a flat surface for shelves or boxes, and it keeps small items from falling into gaps. Just make sure to use exterior-grade plywood—it resists moisture and lasts longer.
Follow these tips, and you’ll avoid 90% of the problems that ruin shed bases. Now, let’s wrap up with a quick recap to make sure you have all the key info.
And if you’re after a base for storage shed that can truly maximize this organized setup, the YODOLLA 12' x 14' Outdoor Storage Shed with Sliding Door is a game-changer. The sliding door is a big plus too: it doesn’t need extra space to swing open, which means you can use every inch of the area around the shed (no wasted space for door clearance).

Conclusion
Choosing the right shed base isn’t just a “prep step”—it’s the most important part of protecting your shed investment. A good base keeps your shed stable, dry, and usable for decades, while a bad one (or no base at all) will turn your shed into a costly headache in just a few years.
Let’s recap the key points: A shed base matters because it supports weight, keeps the shed level, and blocks moisture—all things that extend your shed’s lifespan by 10-15 years. Before choosing a base, consider your shed’s size and weight (heavy sheds need concrete base for shed), ground condition (sloped ground needs leveling), drainage (wet areas need gravel or plastic shed base), budget (gravel is cheapest), and climate (frost needs frost-resistant materials).
At the end of the day, investing time in a good shed base means you’ll spend less time fixing issues and more time using your shed. Whether you choose a concrete base for shed, plastic shed base, or something else—make sure it fits your shed, your ground, and your needs. Your shed (and your tools) will thank you for it!