If you’ve ever wasted time digging for a screwdriver in a messy tool chest or pulled out a rusty wrench, you know the pain of disorganization. Whether you use a Craftsman tool chest, a rolling tool chest for garage work, or a compact drawer tool chest for small fixes, keeping it tidy makes your work way easier.
Learning how to organize a tool chest is simple. This guide walks you through steps from emptying to labeling, plus shares tool chest organization ideas that work for any chest—big or small. By the end, you’ll find tools in seconds, not minutes.
1. Why Organizing Your Tool Chest Matters
You might think “I know where my tools are”—but a tidy chest saves time, protects tools, and keeps you safe. Here’s why it’s worth it:
First, it cuts down on search time. Need an adjustable wrench for a leaky faucet? An organized drawer tool chest lets you grab it in 2 seconds. A messy one? You’ll waste 5–10 minutes sifting through junk. A 2024 DIY survey found disorganized chests cost 2 hours of lost time per month—whether it’s a rolling tool chest or Craftsman tool chest, organization fixes that.
Second, it makes tools last longer. Jumbled tools get scratched, dented, or rusty—think a metal socket chipped by a hammer, or a wet drill bit rusting under rags. An organized tool chest keeps them separated: soft trays for hand tools, padded spots for power tools. Tool makers say a well-kept Craftsman tool chest with organized tools lasts 10+ years longer.
Third, it boosts efficiency and safety. A cluttered chest makes you grab the wrong wrench or knock over tools. Loose screwdrivers can roll off a rolling tool chest and trip you; sharp chisels left out can cut you. With organization, you grab the right tool fast—building a shelf goes from 2 hours to 1 hour when you pull a tape measure, level, and screws without searching.
Here’s a quick look at the difference:
|
Aspect |
Disorganized Tool Chest |
Organized Tool Chest |
|
Time to Find a Tool |
5–10 minutes (digging through piles) |
10–20 seconds (labeled spot) |
|
Tool Lifespan |
Shorter (rust, scratches) |
Longer (protected, separated) |
|
Work Efficiency |
Slow (wrong tools, stops to search) |
Fast (no interruptions) |
|
Safety |
Risky (trips, cuts) |
Safe (tools in place) |
Now that you know why organization matters, let’s start with Step 1: emptying and cleaning your chest. It’s quick (1–2 hours) and sets the stage for a tidy setup. Let’s go!

2. Empty and Clean Your Tool Chest
The first step to organizing your tool chest—whether it’s a Craftsman tool chest, rolling tool chest, or drawer tool chest—is to empty it completely. This might feel messy at first, but it’s the only way to see every tool and spot hidden grime.
Start by taking out all tools and laying them on a clean tarp or workbench. Group them roughly (don’t worry about sorting yet)—just get everything out of the chest. Next, clean the drawers and compartments: wipe down surfaces with a damp cloth to remove dust, grease, or rust flakes. For sticky spots (like old oil), use a mild soap and water—avoid harsh chemicals that could damage the chest’s finish.
While cleaning, check each tool for damage or wear. Is a screwdriver’s handle cracked? Is a wrench rusted shut? Set broken or useless tools aside to replace later—there’s no point organizing tools you can’t use. This step also helps you count what you have: you might find two of the same wrench or a missing drill bit you thought was gone. By the end, your empty tool chest will be clean, and you’ll have a clear list of tools to organize—setting you up for success with the next steps.
3. Sort and Categorize Your Tools
Now that your tool chest is clean, it’s time to sort your tools—this is where tool chest organization ideas start to work. Use three simple categories to group them; it’ll make putting them back easier, no matter if you have a rolling tool chest or a small drawer tool chest.
First, sort by type. Split tools into groups like hand tools (screwdrivers, wrenches, pliers), power tools (drills, sanders), and accessories (screws, nails, drill bits). This makes sense because you’ll usually grab all tools of one type for a project—like using only hand tools for a small repair. For example, keep all screwdrivers together instead of mixing them with power tools in your Craftsman tool chest.
Second, sort by how often you use them. Separate “everyday tools” (the ones you grab weekly, like a tape measure or adjustable wrench) from “occasional tools” (things you use once a month, like a pipe cutter). This helps later when you assign drawer space—everyday tools go in easy-to-reach spots.
Third, sort by size. Within each type, group small tools (tiny screwdrivers, small pliers) and large tools (big wrenches, heavy hammers). This keeps drawers from feeling jumbled—small tools won’t get lost under large ones. For example, in your drawer tool chest, put small wrenches in a shallow tray and large ones in a deeper compartment.
A quick sorting tip: Use baskets or bins to hold each group while you work. It keeps the mess contained and lets you see exactly how much space each category will need in your tool chest.
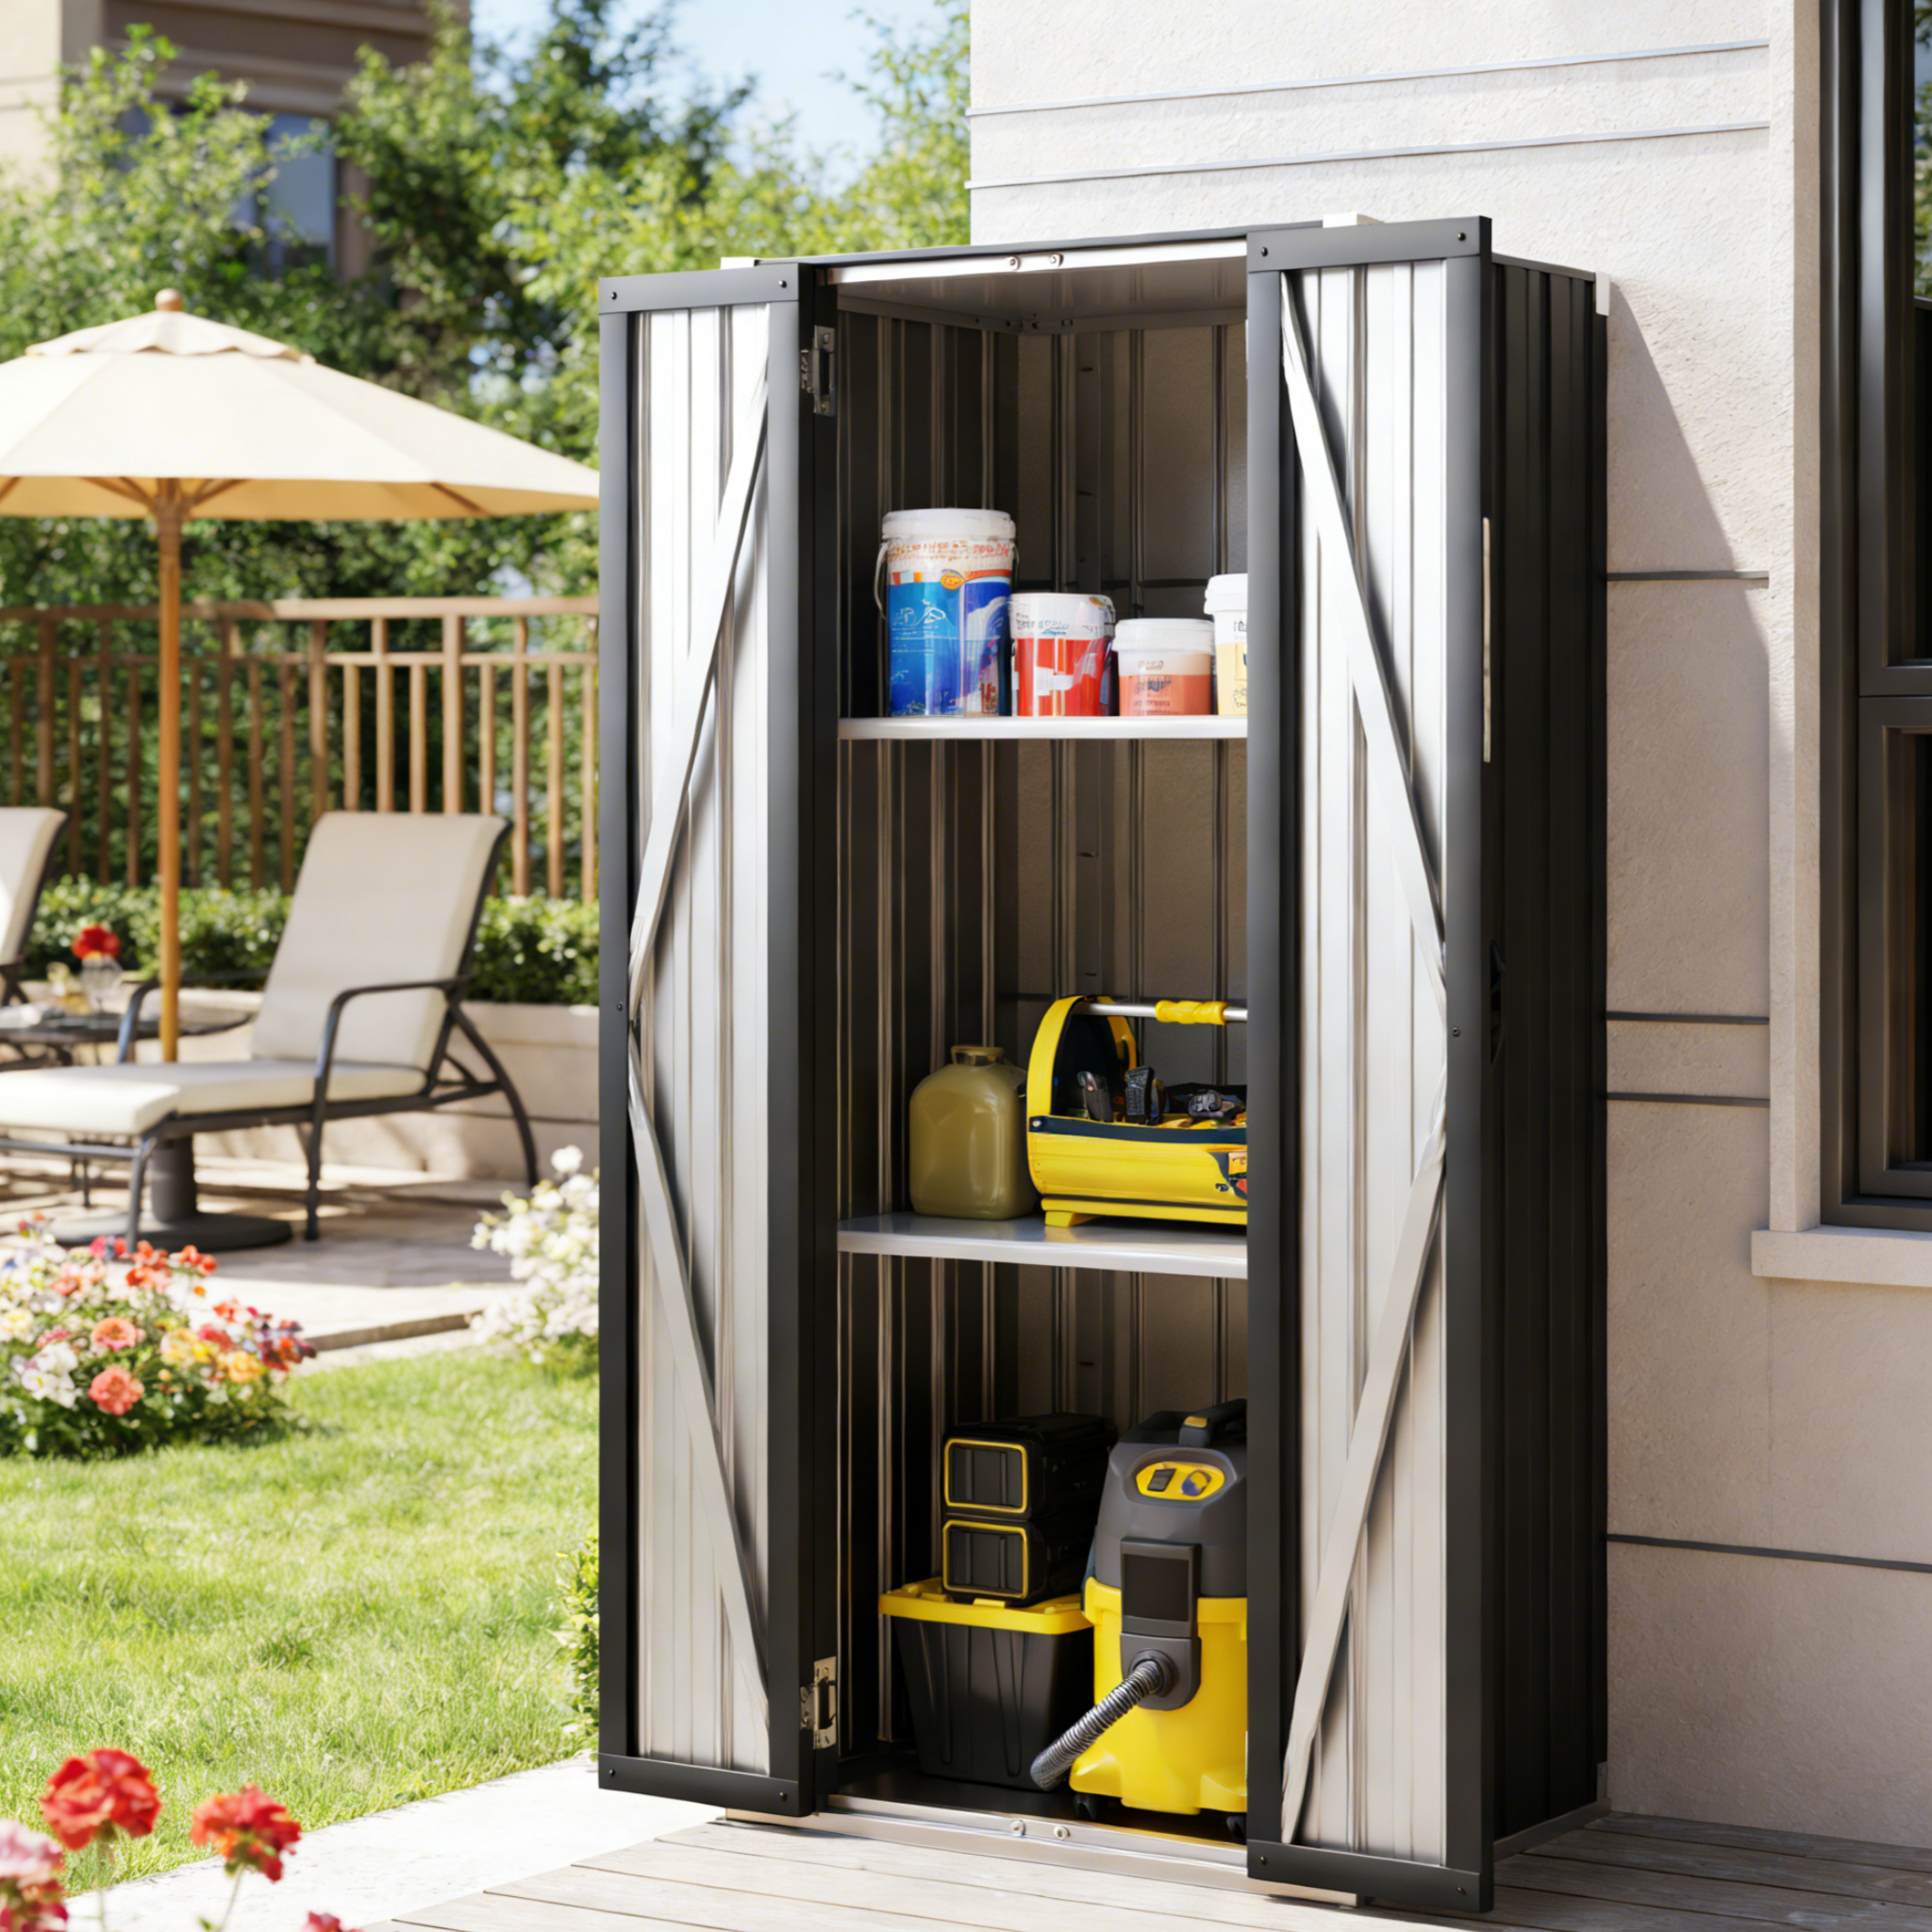
If you’re using a rolling tool chest like the YODOLLA 8-drawer tool chest, its multi-tier storage fits this sorting system perfectly. You can put small everyday hand tools (like screwdrivers) in the upper drawers, and larger occasional tools (such as heavy hammers) in the deep lower cabinet. Plus, its detachable hooks and EVA-lined compartments help keep sorted accessories (like drill bits) from scratching and stay organized.

4. Choose the Right Drawer Layout
Now that your tools are sorted, it’s time to assign them to drawers—this is key to making how to organize a tool chest stick long-term. The goal is to put tools where you’ll reach for them naturally, whether you’re using a rolling tool chest, drawer tool chest, or Craftsman tool chest.
Start with the top drawers: These are the easiest to reach, so put small, everyday tools here. Think screwdrivers, small pliers, hex keys, or a mini tape measure. If your drawer tool chest has shallow top drawers, use them for tiny accessories like screws or drill bits—just add a divider to keep them separated. For a rolling tool chest, top drawers are perfect for tools you need to grab quickly, like a utility knife or pencil.
Middle drawers are for medium-sized, frequently used tools. This is where power tools (like a small drill) or often-used accessories (like a set of regular wrenches) go. If you have a Craftsman tool chest with wide middle drawers, keep power tools here—they’ll be easy to grab but not in the way of small everyday tools. You can also put tool organizers (like a wrench tray) in middle drawers to keep tools lined up.
Bottom drawers are for heavy, less frequent tools. These are the hardest to reach, so save them for things like large hammers, pipe wrenches, or spare parts (like extra drill batteries). In a rolling tool chest, bottom drawers are sturdy enough for heavy tools—they won’t tip the chest over. For a drawer tool chest, use bottom drawers for tools you don’t need often, like a bolt cutter or large level.
A layout pro tip: Sketch a quick map of your tool chest drawers before putting tools in. Note which category goes where (e.g., “Top Drawer: Small Screwdrivers”)—this helps you (and anyone else using the chest) remember where things go. It also makes it easier to adjust later if a drawer feels too full!
5. Use Organizers and Dividers
Once your drawers have a layout, organizers and dividers turn messy space into neat spots—this is where tool chest organization tips really shine. No matter if you have a Craftsman tool chest, rolling tool chest, or drawer tool chest, the right organizers stop tools from sliding around.
Start with drawer dividers and trays. For small tools like screwdrivers or wrenches, use plastic or metal dividers to split drawers into sections—one section per tool type. Wrench trays (with slots for each size) are perfect for middle drawers of a drawer tool chest; they keep wrenches lined up so you can grab the right size at a glance. Foam inserts work too—cut them to fit your chest’s drawers, then carve out spots for each tool (great for a Craftsman tool chest where you want a custom fit).
Magnetic strips and hooks are game-changers for small metal tools. Stick a magnetic strip inside the top lid of your rolling tool chest—it holds screwdrivers, pliers, or small wrenches, freeing up drawer space. Hooks (mounted on drawer sides) work for things like tape measures or utility knives—just hang them where you can reach quickly.
Don’t forget DIY hacks if you’re on a budget. Cut PVC pipes into short pieces and glue them to a board—they make great holders for drill bits or small sockets in a drawer tool chest. Foam boards (cut to size) can also act as dividers—just tape them to drawer bottoms. These simple fixes work almost as well as store-bought organizers, and they’re easy to adjust if you add new tools later.

6. Label and Create a System
Labeling is the final step to make how to organize a tool chest stick—you’ll never forget where tools go, even if months pass. It’s simple, and it works for any chest, from a small drawer tool chest to a big rolling tool chest.
First, label drawers and compartments. Use a label maker or even a permanent marker to write what’s inside each drawer—e.g., “Top Drawer: Small Screwdrivers” or “Middle Drawer: Power Drill + Bits.” Stick labels on drawer fronts so you can see them without opening the drawer—super helpful for a rolling tool chest you move around the garage. For small compartments (like those with screws), label the divider or tray too—“#8 Screws” or “1/4” Drill Bits.”
Color-coding adds another layer of clarity. Assign a color to each tool type: red for hand tools, blue for power tools, green for accessories. Use colored tape or stickers—put a red sticker on the drawer with screwdrivers, a blue one on the power drill drawer. This works great for a Craftsman tool chest used by multiple people; anyone can find tools fast, even if they didn’t organize the chest.
The goal is to make tools easy to locate at a glance. If you see an empty spot in a labeled, color-coded drawer, you’ll know exactly which tool is missing—no more guessing if a wrench is lost or just misplaced. It turns your tool chest into a system that works for you, not against you.
7. Maintenance: Keep It Organized Over Time
Organizing your tool chest isn’t a one-time job—simple maintenance keeps it tidy for years. These small steps take minutes, and they work for any chest, whether it’s a Craftsman tool chest, rolling tool chest, or drawer tool chest.
First, clean and inspect regularly. After every big project (like building a shelf or fixing a bike), spend 5 minutes wiping down your chest. Wipe drawer surfaces to remove dust or grease, and check tools for damage (like a bent wrench or dull drill bit). This stops grime from building up and catches broken tools before they mess up your system.
Always return tools after use—this is the most important rule. It’s easy to set a wrench on a workbench mid-project, but taking 10 seconds to put it back in its labeled spot saves hours of searching later. If you’re in a hurry, keep a small bin near your chest—toss tools in it, then sort and put them away at the end of the day.
Reorganize every 6 months or season. Over time, you might add new tools or stop using old ones—your layout needs to adapt. Pull out all tools, check if the current setup still works (e.g., is that rarely used pipe cutter still in a middle drawer?), and adjust as needed. Maybe your drawer tool chest needs a new divider for a set of new screwdrivers, or your rolling tool chest’s bottom drawer can hold a new heavy tool. This quick refresh keeps your system efficient, so your tool chest stays organized for good.
By following these steps, your tool chest will go from chaotic to calm—and you’ll spend less time searching for tools, and more time getting projects done. Whether it’s a Craftsman tool chest passed down or a new rolling tool chest, an organized setup makes every job easier!